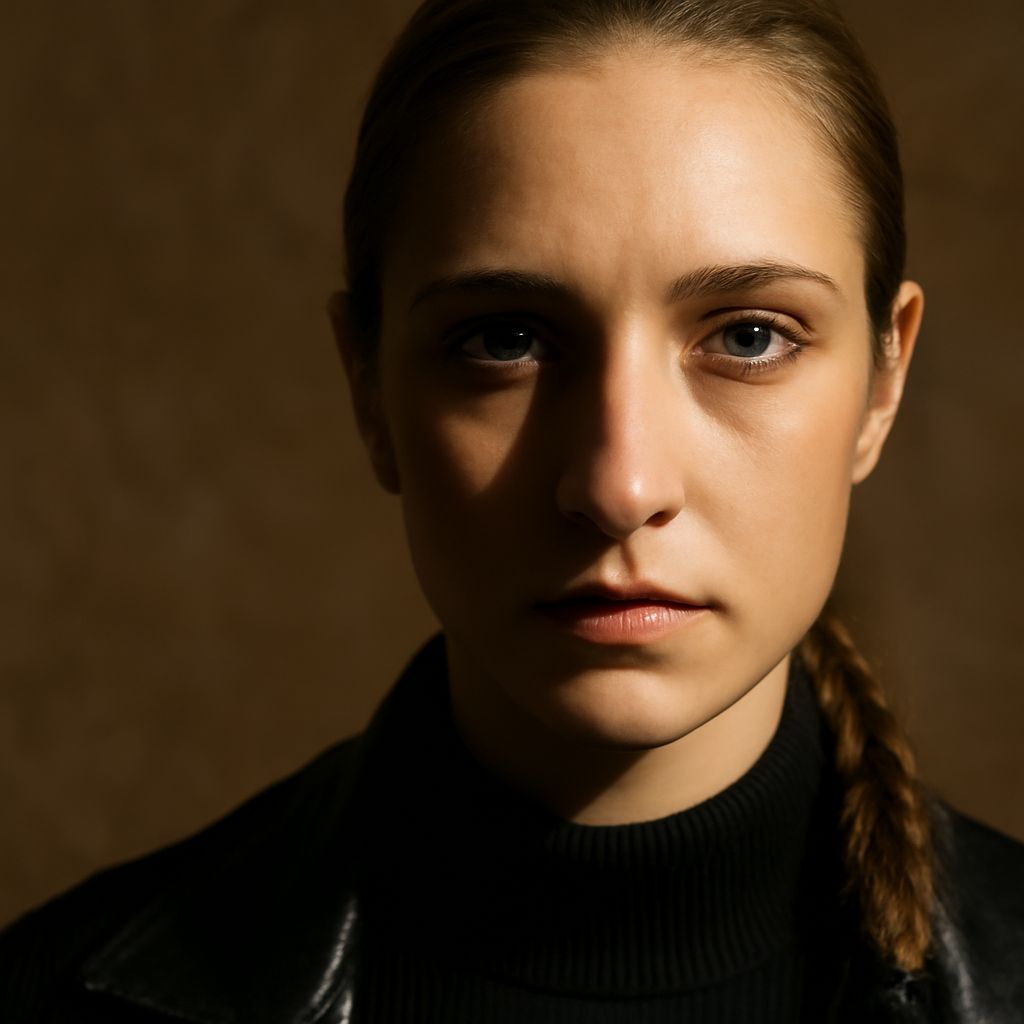
Key lighting is the primary light that establishes a portrait’s direction, brightness, and shadow pattern. It does not have to come from a particular type of equipment: a flash, window, lamp, or reflector can serve as the key if it provides the main illumination on the face.
With an off-camera flash, you can shape that light to create the classic Rembrandt triangle: a small, illuminated patch on the shadow-side cheek beneath the eye. Placement controls the pattern, while source size and fill determine whether the portrait looks sculpted or harsh.
How Key Lighting Controls a Flash Portrait
The key light determines where the face appears dimensional. Move it higher and the brow, nose, and cheek cast longer downward shadows. Move it toward the side and the portrait gains contrast between the lit and shadowed halves. Lower or frontal placement produces flatter illumination and reduces the characteristic cheek shadow.
Begin with the subject facing the camera and place the flash about 45 degrees to one side. Raise it roughly 30 to 45 degrees above eye level, aiming toward the face rather than straight at the camera. This position gives the nose shadow room to fall across the cheek while keeping a catchlight visible in the nearer eye.
Set exposure for the face rather than relying on a fixed flash setting. Take a test frame, then check the shadow cheek and eye detail at the working distance. The key should define the face without clipping the forehead or leaving the eye socket unreadable. Keep the camera position fixed while you adjust the light; otherwise, you may mistake a viewpoint change for a lighting change.
How Camera Flashes Become a Shaped Key Light
Camera flashes rarely create Rembrandt lighting when used directly on the camera. Their position is close to the camera axis, so the light travels almost straight toward the face. That minimizes side-to-side modeling, places the catchlights near the center of the eyes, and sends the nose shadow mostly behind the nose instead of across the cheek.
Move the flash off-camera with a radio trigger, cable, or compatible remote system. A small bare flash can produce the pattern, but its hard edge makes every adjustment obvious. A shoot-through umbrella, softbox, or bounced source creates a larger apparent source and softer transitions. The modifier does not change the basic geometry: it changes the size and softness of the key.
- Place the flash to the subject’s left or right, starting about 45 degrees from the camera.
- Raise the source above the subject’s eye line and angle it down toward the bridge of the nose.
- Use a moderate source size for a recognizable triangle with controlled shadow edges.
- Take a test frame before adding fill, then inspect the eyes, nose shadow, and shadow-side cheek.
A larger source placed close to the subject produces softer transitions and more forgiving skin texture. A smaller or more distant source creates a crisper triangle. Keep the source close enough to remain large relative to the face, but far enough away to avoid uneven illumination across the head.
What Creates the Rembrandt Triangle?
The Rembrandt triangle forms when the key illuminates the forehead and upper cheek while the nose shadow joins the shadow from the side of the face. The result is a small patch of light beneath the shadow-side eye. It should remain connected to the brighter area near the eye, not become an isolated spot.
Look for four visible cues:
- Triangle size: It should generally be smaller than the subject’s eye area. If it reaches the mouth or disappears entirely, adjust the light or face angle.
- Catchlights: The key should create a clear reflection in the eyes, usually high and toward the key side. A catchlight dead-center in both eyes suggests overly frontal light.
- Nose shadow: It should point diagonally downward and meet the cheek shadow without covering the entire eye.
- Shadow detail: You should still see the eye socket, cheek contour, and hairline in the dark side.
Adjusting Face Turn, Light Height, and Fill
Make one change at a time. If the triangle is too small or missing, move the key farther toward the side, raise it slightly, or turn the face a few degrees away from the key. If the shadow cuts across the eye, lower the source or turn the face slightly toward it. Small movements can change the nose shadow substantially.
Light height controls the triangle’s vertical position. Raise the flash until the nose shadow travels downward toward the cheek, but stop before the eye falls into deep shadow. If the shadow reaches below the cheekbone, lower the source or use a larger modifier.
Add fill from the camera axis only after the key pattern works. A reflector or second flash set about one to two stops darker than the key will open the shadow without erasing the triangle. Increase fill if the shadow-side eye lacks detail; reduce it if the triangle becomes pale or the portrait loses directional contrast.
For natural-looking catchlights, keep the fill broad and weak, and let the off-camera key remain the brightest reflection. A successful frame shows a readable triangle, a diagonal nose shadow, one dominant catchlight pattern, and enough shadow detail to reveal the face’s structure.